

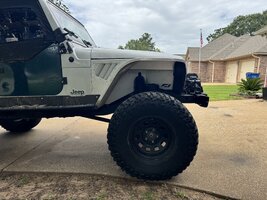
The Highline Fender project is COMPLETE!
This was pretty easy, but not as quick of a project as it should have been (purely my fault). And while it will not make as much of a difference in terms of performance-especially when compared to the 241 swap or suspension upgrade-I am pretty excited about this!
I was able to find a good location for everything that was attached to the stock fenders. I had intentions of ditching the stock filter box, but decided against it. The only thing left is the windshield washer fluid reservoir. I am going to try heating the bottle and shaping it to fit the new space like I have heard of others doing. If I mess that up, I will just get a cheap aftermarket reservoir.
When cutting the hood, I followed Motobilt's instructions by cutting along the body line. That left me with a gap of 1 3/16" in the front. So, I made a line with painter's tape from 1/8" above the cut line at the rear to 1 1/8" above the cut line at the front. After those cuts were made the hood sat perfectly! I used a cutoff wheel and a palm sander to clean everything up. I thought while I had the hood off, it would be a good time to install Motobilt's hood vent kit. Not sure how much it will help, but I think it looks cool.


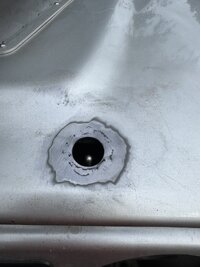
I went with low profile hood pins from Quick Latch. The install was easy, but slow because I made a huge mistake. I did the passenger side first and it went beautifully. But, for some reason I cannot figure, I used the 1 3/4" hole saw bit instead of the proper 1 1/4". Yep, that hurt. Fortunately, I have a buddy that is great at welding. With a little bodywork and a new paint job (hopefully this fall) it will be like it never happened!


Here is the finished product!


This was pretty easy, but not as quick of a project as it should have been (purely my fault). And while it will not make as much of a difference in terms of performance-especially when compared to the 241 swap or suspension upgrade-I am pretty excited about this!
I was able to find a good location for everything that was attached to the stock fenders. I had intentions of ditching the stock filter box, but decided against it. The only thing left is the windshield washer fluid reservoir. I am going to try heating the bottle and shaping it to fit the new space like I have heard of others doing. If I mess that up, I will just get a cheap aftermarket reservoir.
When cutting the hood, I followed Motobilt's instructions by cutting along the body line. That left me with a gap of 1 3/16" in the front. So, I made a line with painter's tape from 1/8" above the cut line at the rear to 1 1/8" above the cut line at the front. After those cuts were made the hood sat perfectly! I used a cutoff wheel and a palm sander to clean everything up. I thought while I had the hood off, it would be a good time to install Motobilt's hood vent kit. Not sure how much it will help, but I think it looks cool.
I went with low profile hood pins from Quick Latch. The install was easy, but slow because I made a huge mistake. I did the passenger side first and it went beautifully. But, for some reason I cannot figure, I used the 1 3/4" hole saw bit instead of the proper 1 1/4". Yep, that hurt. Fortunately, I have a buddy that is great at welding. With a little bodywork and a new paint job (hopefully this fall) it will be like it never happened!
Here is the finished product!


")